I often find that the best gifts for Mom come from a quiet afternoon at the kitchen table, bits of paper and ribbon scattered around while a favourite playlist hums in the background. Handmade Mothers Day Gift Crafts bring that warm, personal feeling — the kind that a store aisle rarely matches.
Over the years I’ve tried things that smelled of citrus, projects that felt soft and textile-heavy, and small keepsakes that fit in a pocket.
Each of these Handmade Mothers Day Gift Crafts carries a little story, a texture to hold, and a smile that lingers longer than a boxed present.
Pressed wildflower shadow box for a sunlit shelf
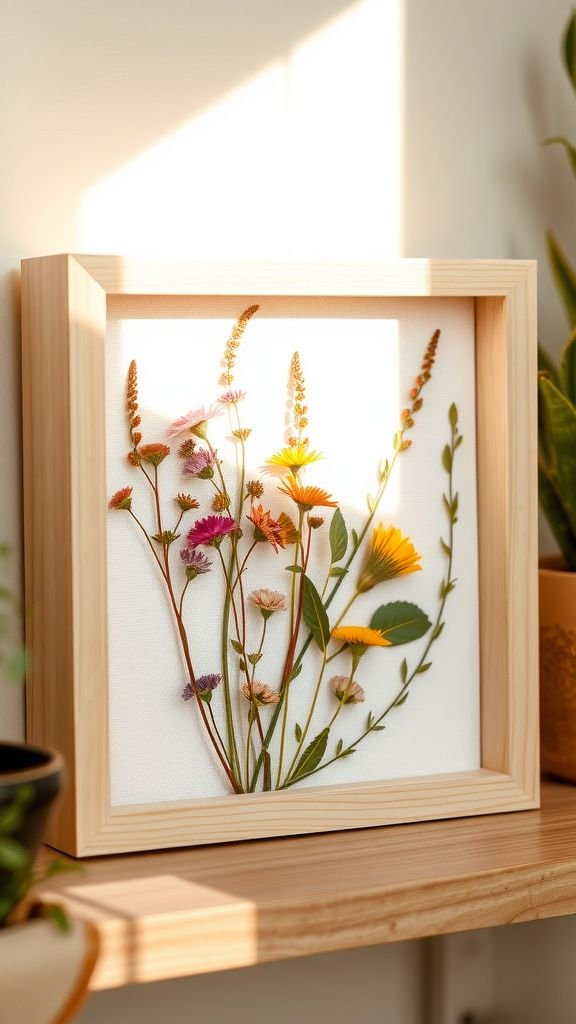
I remember collecting the tiniest blooms from a neighbor’s verge, their colors fragile but stubborn. The shadow box holds those flattened petals like a paused summer, the translucent veins catching light in the same way old glass does.
The background paper felt like linen under my fingertips and the whole piece has a quiet, museum-like calm. Placing it on a sunlit shelf creates gentle shadows that move through the day, and every glance brings back the soft rustle of grass and a small, private grin.
Steps
- Select a shallow wooden or metal shadow box and a clean sheet of acid-free backing.
- Carefully press chosen flowers between absorbent paper inside a heavy book for several days until fully flattened.
- Arrange the pressed blooms on the backing, then secure them with archival adhesive or mounting corners inside the box frame.
- Close and seal the frame, ensuring no dust remains, and set the box in a place that receives indirect light.
Hand-painted ceramic mug with loose floral brushstrokes
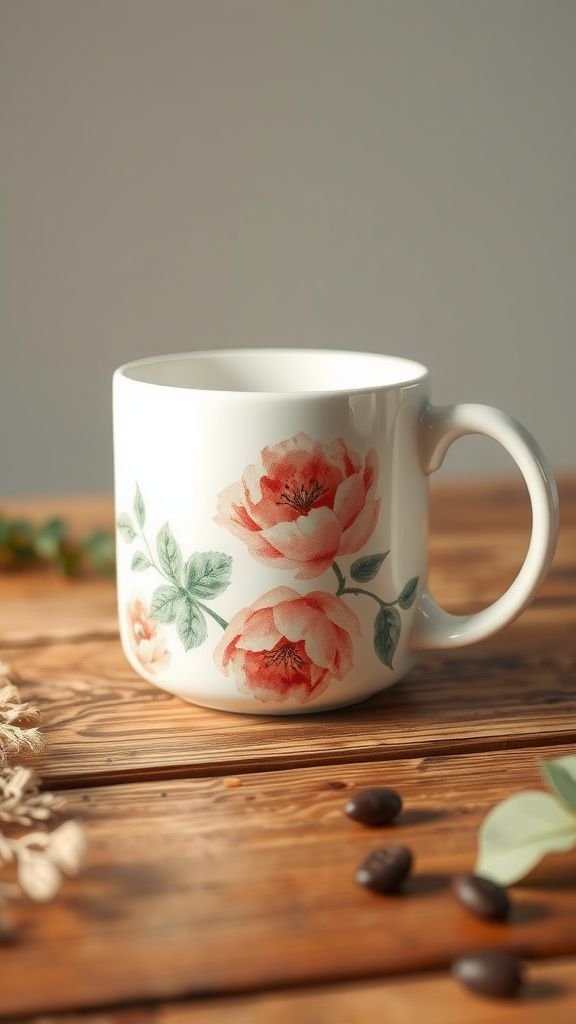
There’s a particular joy in sipping tea from a mug that carries a handmade mark. The mug I painted has loose floral strokes that look almost accidental, each petal uneven in the most comforting way.
The paint has a slightly raised texture where the brush paused, and the glaze caught tiny flecks like distant stars. Every morning the mug warms my palms differently than a factory cup, and the thought of Mom wrapping her fingers around that warmth feels like sharing a quiet ritual across time.
Steps
- Choose a plain bisque ceramic mug and gather underglaze paints or ceramic paints suitable for firing or oven-setting.
- Sketch a simple floral motif with a faint pencil guide, then apply loose brushstrokes with varying pressure for petal texture.
- Allow painted details to dry fully, then follow paint manufacturer instructions for curing or firing to set the design permanently.
- Hand-wash with a gentle detergent when needed to preserve the painted surface.
Memory jar filled with notes and tiny mementos
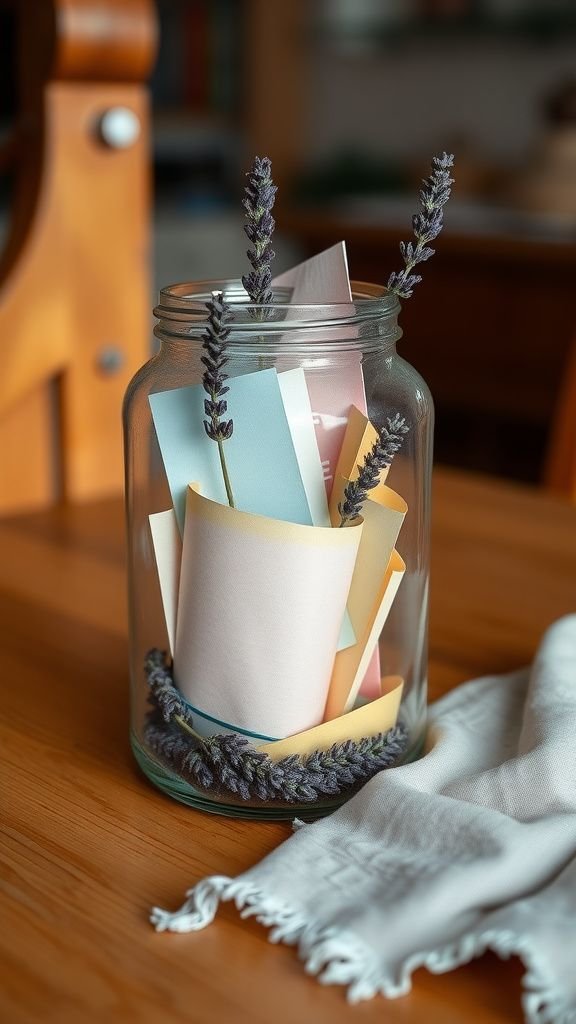
A jar of memories always felt like a small, living archive to me. This one held slips of paper folded into little boats of handwriting, scent of dried lavender tucked among coins and ticket stubs.
The glass lets light pool at the bottom and the whole thing has the reassuring weight of something cherished. Opening it releases a cascade of small stories—snatches of laughter, an offhand compliment, the name of a long-forgotten café.
It felt like bottling comfort, and passing it along felt like handing over a gentle map of shared moments.
Steps
- Select a clear glass jar with a tight-fitting lid and clean it thoroughly.
- Cut or tear colored paper into small squares and write brief memories, quotes, or reasons for appreciation on each slip.
- Fold the notes and layer them into the jar alternating with tiny keepsakes such as dried petals, ticket stubs, or pressed leaves.
- Seal the jar and adorn the lid with a ribbon or label for presentation.
Lavender-scented bath salts in a mason jar
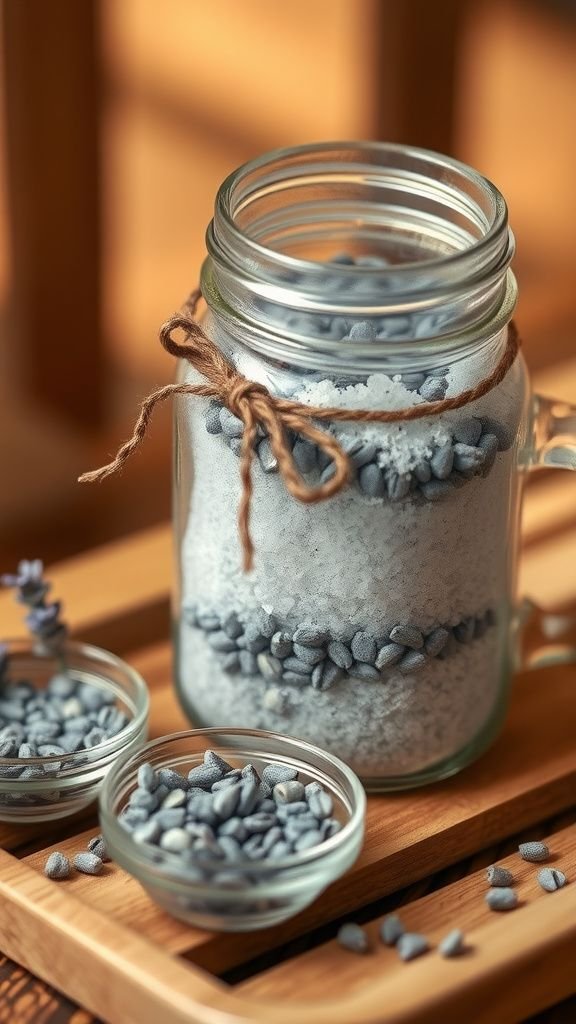
The first time I opened a jar of lavender salts I was transported to a quiet afternoon nap under a window. The scent is gentle, floral with a hint of earth, and the crystals catch light like tiny gems.
Seeing the layered colors of salt and dried lavender creates a small ritual before the ritual itself, the jar promising a long soak and a pause from noise. It looks inviting on a bathroom shelf and feels like a little luxury that can be reached for without fuss on a tired evening.
Steps
- Measure coarse Epsom or sea salt and place it into a mixing bowl appropriate for combining dry ingredients.
- Add a few drops of lavender essential oil and sprinkle in dried lavender buds before stirring thoroughly to distribute scent.
- Transfer the blended salts into a clean mason jar, tamping gently to compact the mixture and removing any air pockets.
- Seal the jar and affix a handwritten label indicating the scent and suggested soak amount per bath.
Delicate embroidered linen handkerchief with initials
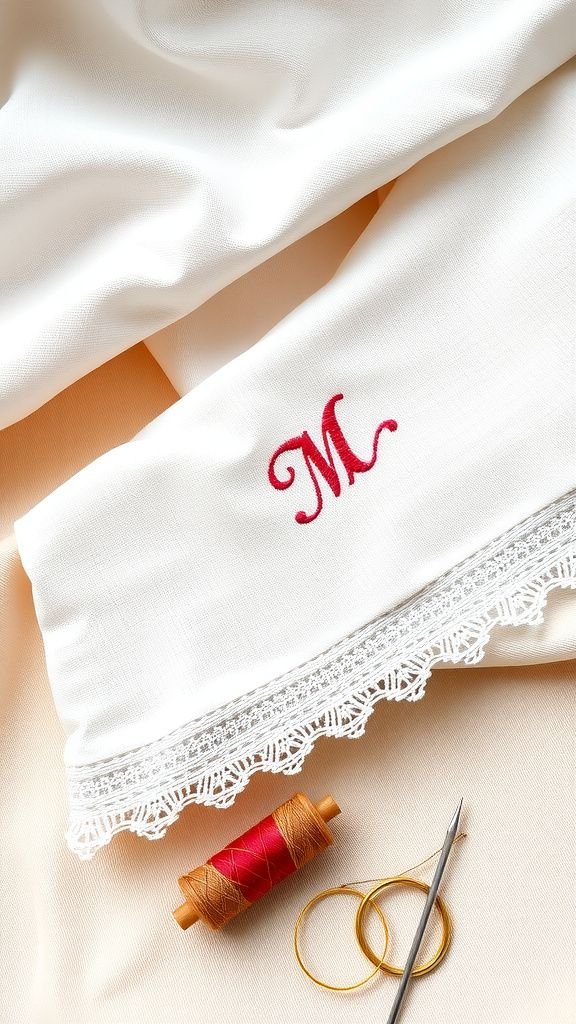
Embroidering initials onto a linen handkerchief feels both intimate and timeless. The fabric has a cool, slightly crisp touch and the threads add a subtle relief that catches the light when it moves.
I remember choosing thread colors that seemed to hum with the fabric—soft rose, dusty blue—stitch after stitch turning a plain square into something quietly personal. Folding it to reveal the tiny initials always felt like folding a note.
Handing it over felt like giving a small heirloom that might be tucked away for years.
Steps
- Select a fine linen handkerchief and decide on a small monogram design and thread colors.
- Transfer the monogram to the fabric using a water-soluble or heat-erasable transfer method before beginning to embroider.
- Employ basic embroidery stitches such as backstitch, satin stitch, or French knots to render the design neatly.
- Rinse away any transfer markings, press the fabric lightly, and present the handkerchief folded with the monogram visible.
Personalized recipe book filled with family flavors

Compiling recipes felt like stitching together a family map, each page smelling faintly of onions, cinnamon, or citrus depending on the dish. Handwritten cards slipped into the binding had smudges from hurried afternoons and a charm that typed text lacks.
The cover wore a faded floral cloth that made the book feel lived-in from the first moment. Flipping through brought back small gestures: the clink of a spoon, a quiet critique from an uncle.
It read like a culinary conversation, and giving it felt like sharing a lineage of taste.
Steps
- Gather favorite family recipes on cards or printed pages and sort them into categories such as starters, mains, and desserts.
- Design a cover using cardstock or fabric-covered boards and bind the pages using a ring binder or a simple bookbinding method.
- Add personal notes or anecdotes beside each recipe to give context and warmth.
- Finish with a protective cover or sleeve to keep the book durable in kitchen conditions.
Mixed-photo collage on stretched canvas for wall display
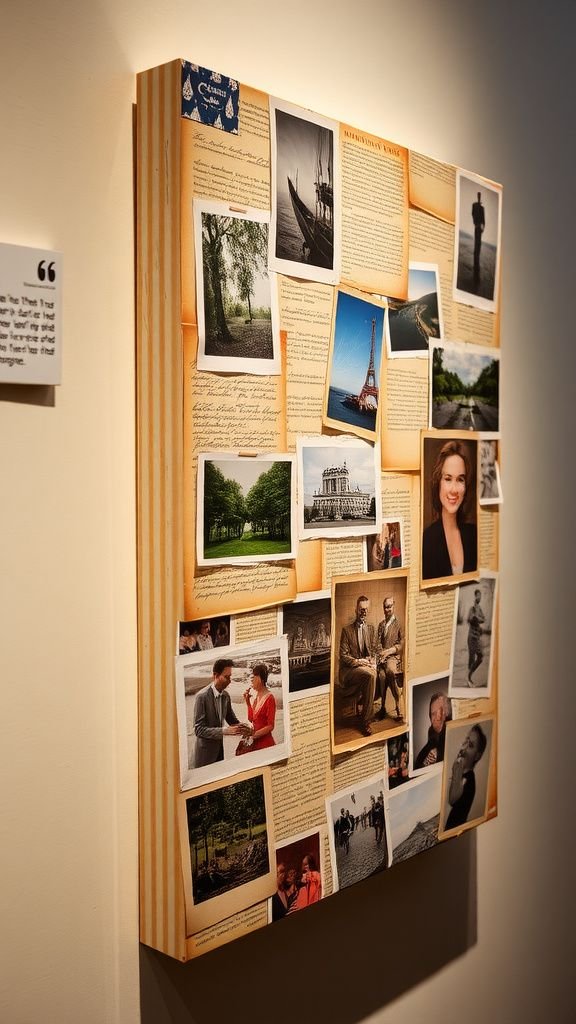
A wall collage of photos has this lively, almost conversational energy. Faces and places overlap slightly, edges softened by torn paper and little captions in ink.
The canvas has a toothy surface that catches glue and ink in ways that feel tactile under fingertips. I lingered over the arrangement, enjoying how a small Polaroid could change the rhythm of the whole piece.
Hanging it felt like giving a moving story rather than a single portrait, a patchwork of days and smiles that fits into daily life like a warm patch on a sweater.
Steps
- Select a range of printed photographs and choose a stretched canvas as the backing surface.
- Arrange the photos on the canvas without adhesive to test composition until satisfied with placement.
- Adhere the photos using archival glue or medium, smoothing gently to remove air bubbles and ensure secure contact.
- Add small handwritten captions or decorative paper accents, then allow the collage to dry fully before hanging.
Crocheted heart dishcloth in soft cotton yarn
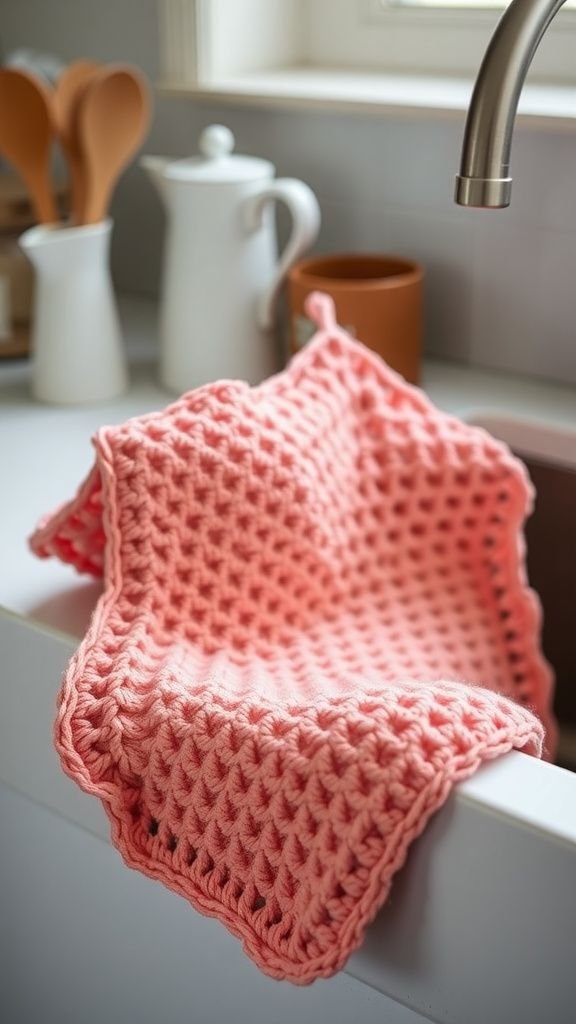
The little dishcloth with a heart motif became my go-to for small kitchen tasks and felt unexpectedly joyful. The cotton yarn has a satisfying squish under fingertips and the stitches created a subtle pattern that caught light differently across the surface.
It was pleasant to hold and soft enough for delicate glassware yet sturdy in texture. The heart sits slightly proud in the center, a tactile reminder of care during mundane chores.
I liked the way it looked hanging by the sink, adding a small domestic cheer each morning.
Steps
- Choose a soft cotton yarn and an appropriately sized crochet hook for a dense but pliable fabric.
- Begin with a foundation chain and work a flat square or heart motif using single and double crochet stitches as preferred.
- Finish edges with a neat border row to stabilize the shape and weave in loose yarn tails securely.
- Block the finished cloth lightly to even out stitches and present it folded or hung for gifting.
Mason jar herb planter for sunny windowsills
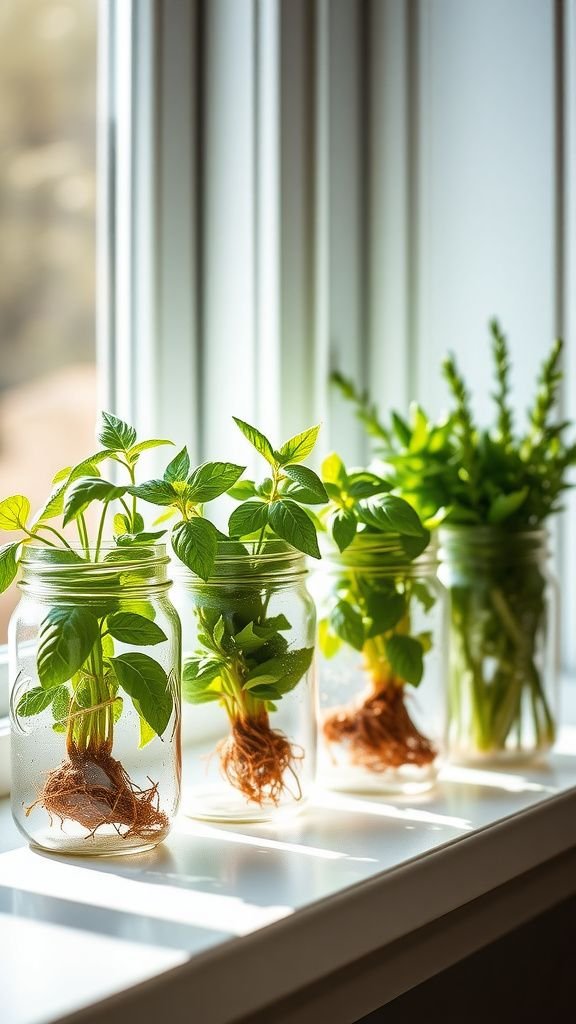
Small herb planters on a windowsill brought a slice of garden into the kitchen. The mason jar caught condensation and roots peeking through the glass, which felt oddly satisfying, like watching a secret at work.
The aroma from cut basil or mint when brushed with fingers was immediate and alive. The green leaves contrasted with the clear, cool jar, and the whole setup seemed cheerful and useful at once.
It was a simple green island that made ordinary cooking moments smell fresher and look friendlier.
Steps
- Choose clean mason jars and add a small layer of pebbles or coarse sand to aid drainage at the base.
- Fill jars with potting mix suitable for herbs, leaving room for roots, and plant small herb seedlings gently into each jar.
- Place the jars on a sunny windowsill where they receive regular light and water sparingly to avoid waterlogging.
- Rotate jars occasionally for even growth and trim herbs as needed to encourage bushier plants.
Beeswax pillar candles with dried citrus slices
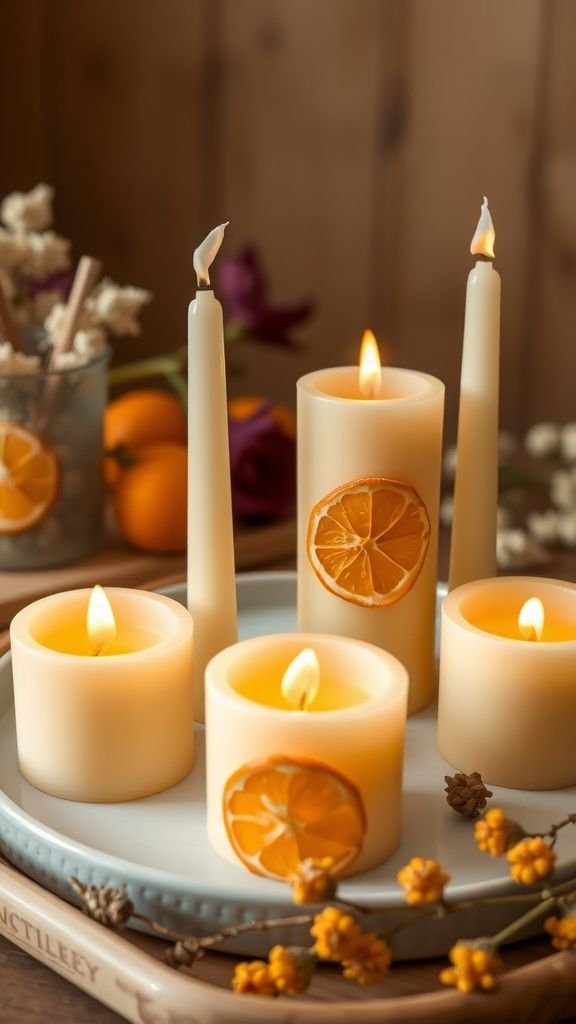
The beeswax candles felt warm even before lighting; their soft honey hue and faint sweet aroma filled the room with a cozy hush. Thin slices of orange pressed against the outer layers created charming silhouettes that glowed from within.
The surface was slightly ridged where the wax cooled, and the scent carried a dry, citrusy note that felt clean and restorative. Placing them on a ceramic plate made them look like a small vignette, the kind of piece that encourages one slow evening rather than a rushed routine.
Steps
- Melt natural beeswax in a double boiler until it reaches a pourable consistency and prepare candle molds or simple jars.
- Place dried citrus slices against the inner mold wall or side of a jar and secure wicks centered in each container.
- Pour beeswax carefully, allowing small pauses if using a layering effect, and let the wax cool to room temperature.
- Trim wicks to a suitable length and rest the candles on a heat-resistant surface for a final cure before gifting.
Soy candle poured into a vintage teacup
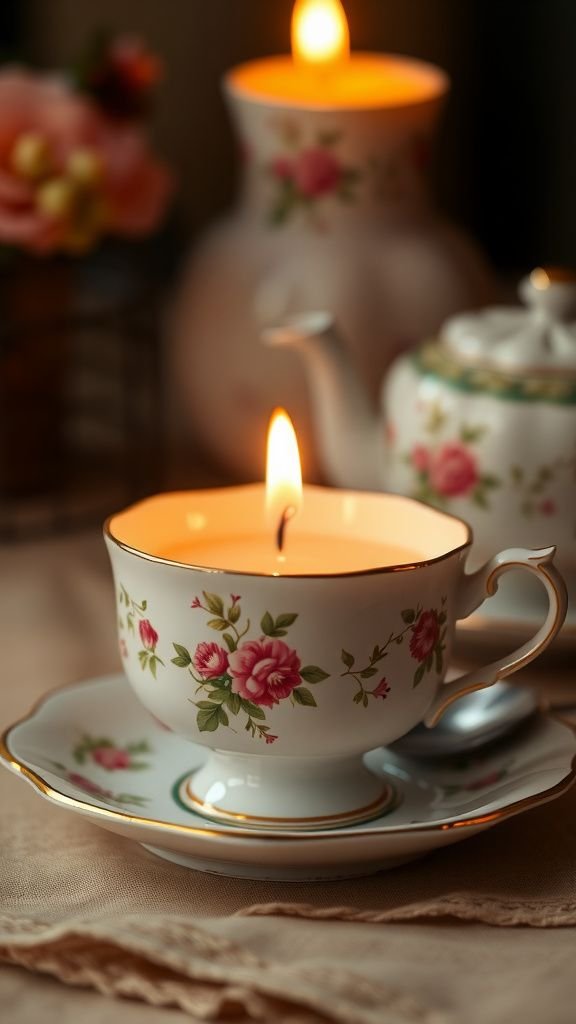
Pouring soy wax into a chipped teacup gave life to an old piece that otherwise sat in a cabinet. The delicate floral pattern became more vivid when lit, and the wax surface reflected the fine gold rim in soft highlights.
The scent blended gently with porcelain heat and the whole object felt like comfort made visible. Placing it on a saucer with a single dried petal looked like a small tea service paused mid-conversation.
It had a domestic charm that seemed both nostalgic and utterly practical.
Steps
- Clean a vintage teacup thoroughly and center a short wick using a wick holder or tape to keep it upright.
- Melt soy wax flakes in a heat-resistant container and add fragrance oil if desired, stirring gently to combine.
- Pour the wax into the teacup to the desired fill level and allow it to cool and solidify completely.
- Trim the wick and set the cup on a decorative saucer before presenting.
Air-dry clay imprint pendant with meaningful texture
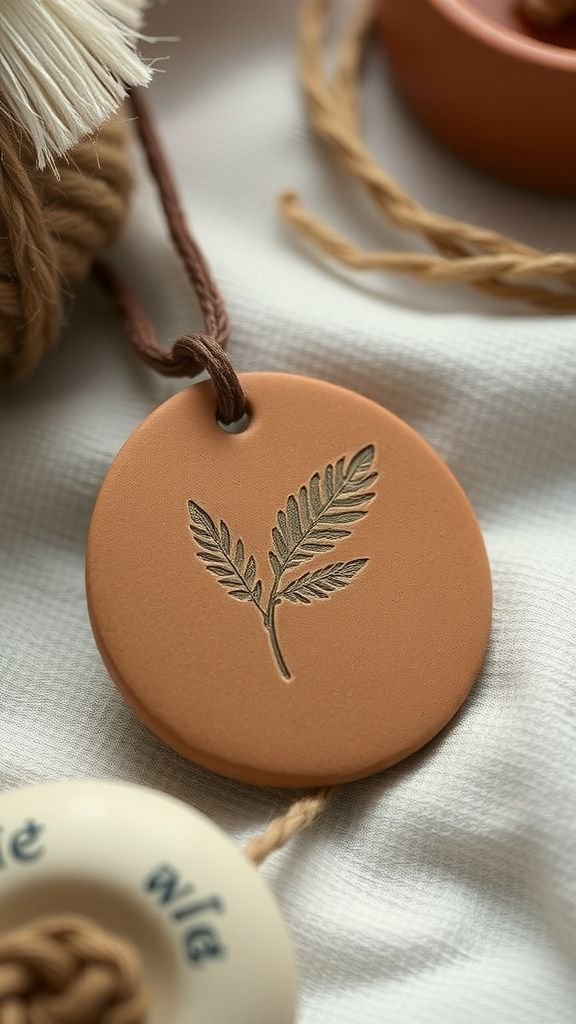
The little pendant held the faint impression of a fingertip and a stretch of linen, a tactile poem. Air-dry clay recorded tiny ridges and the curve of a small leaf with remarkable clarity.
The surface had a matte warmth, slightly cool to the touch, and the cord threaded through it felt like an invitation. Wearing something that carried a physical trace of a place or moment felt intimate—an everyday talisman rather than a flashy trinket.
The pendant seemed to hold a quiet conversation between material and memory.
Steps
- Roll a small portion of air-dry clay to an even thickness and press a chosen texture, leaf, or imprint onto the surface gently.
- Cut or shape the pendant silhouette with a clay tool or knife, and create a small hole near the top for hanging.
- Allow the clay piece to dry fully according to manufacturer directions, then sand lightly if needed and seal with a clear finish.
- Thread a cord or chain through the hole and present the pendant on a simple card or in a small box.
Hand-painted garden marker stones with playful fonts
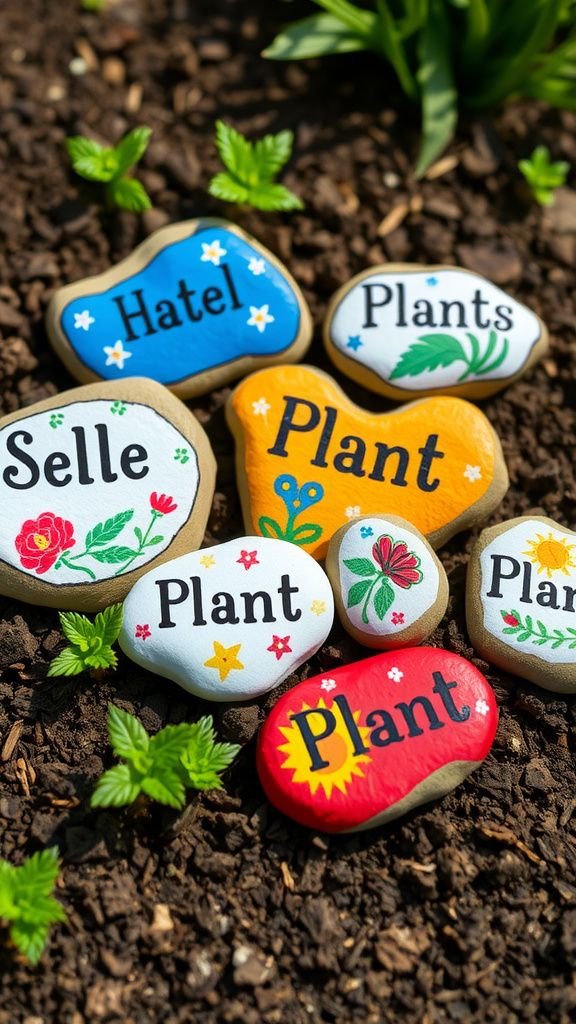
Garden stones painted with plant names felt like little signposts with personality. Each stone had a different shape and weight, smoothed by time, and the paint added pops of color that made the soil feel less anonymous.
The letters were a little wobbly in a charming way, and small motifs of leaves or sunrays made them smile. Placing them at the base of seedlings felt companionable, and their rough texture against fresh green stems created a small harmony.
These stones seemed to turn a patch of earth into a curated nook.
Steps
- Select smooth, clean stones and arrange them to plan plant placement in the garden or pots.
- Sketch plant names lightly with pencil, then apply acrylic paints or weatherproof markers to render letters and small decorative motifs.
- Allow paint to dry fully and finish with a clear outdoor sealant to protect against moisture and UV exposure.
- Place the stones at the base of herbs or flowers for both identification and decoration.
Button bouquet arranged in vintage teapot vase
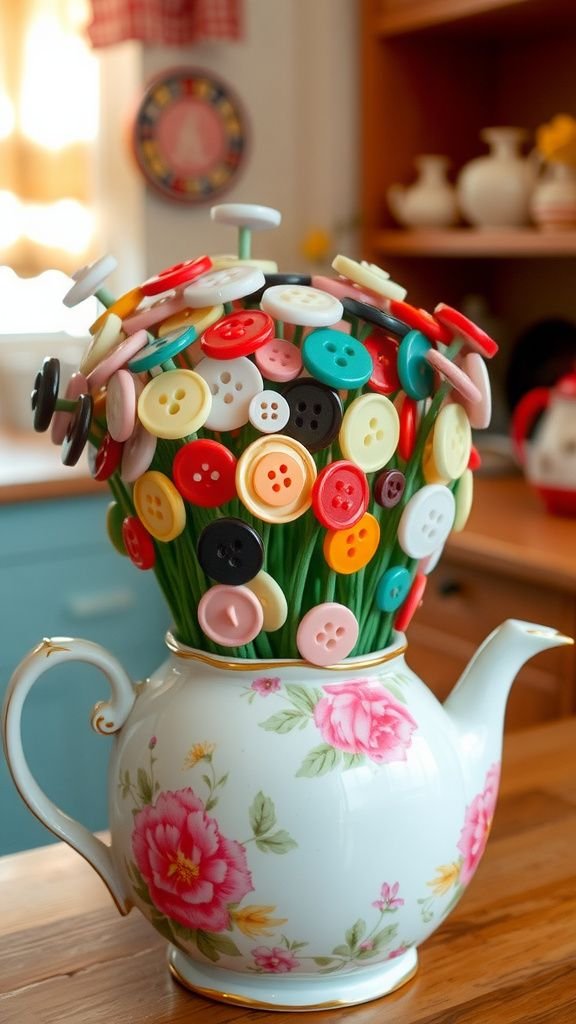
A bouquet made from buttons has a weight and a clack that feels joyful in the hands. Each button reflected light differently—mother-of-pearl gleamed, glass beads caught highlights—and the stems were a quiet green that let the tops speak.
Arranged in a chipped teapot, the whole group read like a patchwork of small celebrations. It had no wilting and could be shuffled about the table without fuss.
The bouquet felt like something that would make a shelf grin, a practical ornament carrying a soft kind of nostalgia.
Steps
- Gather a variety of buttons in complementary colors and sizes, and thread each onto a floral wire stem securing with a small bead or knot at the base.
- Wrap stems with green floral tape for a natural look and arrange them into a compact bouquet shape.
- Place the finished bouquet into a vintage teapot or small vase, adjusting heights and spacing for balance.
- Add a ribbon around the base of the stems or teapot handle for a finished presentation.
Tea sampler box with custom loose-leaf blends
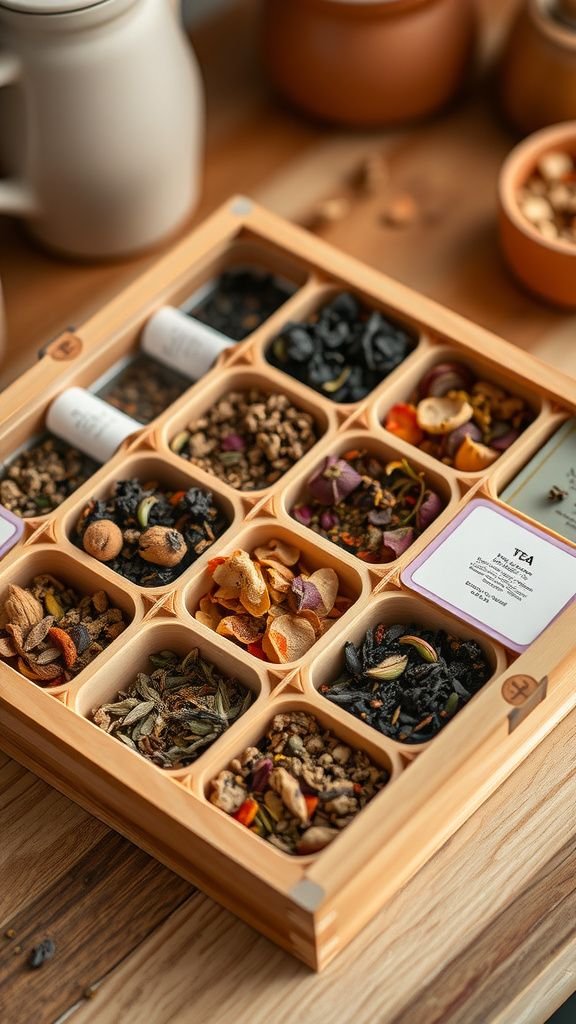
A wooden box of tea felt like a tiny apothecary, each compartment offering a different scent and mood. There was a green blend that smelled of spring rain, a floral mix with chamomile and rose, and a citrus option that felt bright enough to wake a slow morning.
The dried herbs crinkled pleasantly when scooped and the box itself had a soft wood warmth under the fingertips. Presenting the box felt like handing over permission to pause; each tin opened like a small intermission in a busy day.
Steps
- Select a small wooden or cardboard compartment box and measure several types of loose-leaf tea or dried herb blends.
- Blend individual tea mixes in small bowls, adjusting proportions until the aroma feels balanced and appealing.
- Fill compartments or small tins with each blend, label them with names and brief tasting notes, and close securely.
- Present the sampler with a small spoon and brewing suggestions for each blend.
Decoupage wooden tray with vintage paper cutouts
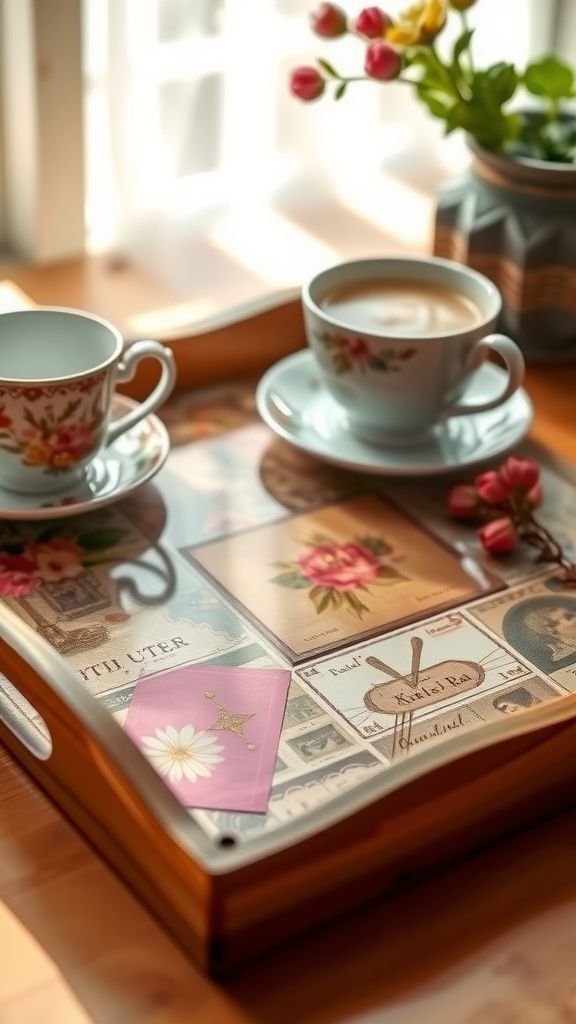
A wooden tray dressed in vintage papers felt like a small stage for breakfast. The paper edges overlapped in a pleasing collage of muted florals and travel ephemera, and the varnish sealed them into a glossy plane that reflected light just enough to catch the eye.
The handles warmed my palms and the tray had a stable weight that felt reliable. It turned ordinary cups into a tiny ceremony, and the combination of paper grain and varnish made each morning feel slightly more considered than the last.
Steps
- Select a plain wooden tray and prepare vintage-style paper cutouts or patterned napkins arranged in a pleasing composition.
- Adhere pieces to the tray surface using a decoupage medium, smoothing to remove bubbles and align patterns.
- Allow the adhesive layer to dry and add multiple protective varnish coats to create a durable finish for domestic use.
- Let the tray cure fully before placing cups or plates on its surface.
Simple macramé keychain with natural cord and beads
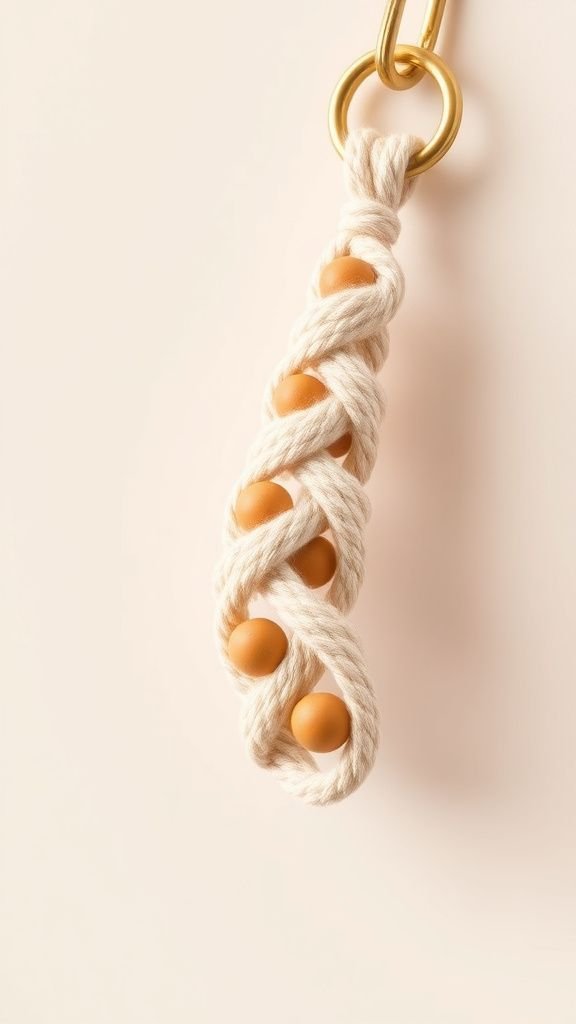
The macramé keychain had a small, dependable heft and a pleasing geometric rhythm in its knots. The cotton cord felt soft but sturdy, and the wooden beads added a gentle contrast against the pale fibers.
It hung from keys like a small banner, occasionally catching the light as the keys turned. The texture invited fingers to trace it while waiting in a doorway, and the neutral palette fit easily with most bags.
It seemed the sort of handmade thing that would quietly accumulate character over time.
Steps
- Cut several lengths of natural cotton cord and secure them at one end to a keyring or metal loop.
- Work basic macramé knots such as square knots or half knots to create a short patterned section, adding wooden or metal beads where desired.
- Finish the ends with a tidy knot and trim any excess cord, fraying ends slightly for a soft tassel effect if preferred.
- Attach to a set of keys or a bag for a small everyday accent.
Layered cookie mix in a mason jar for baking together
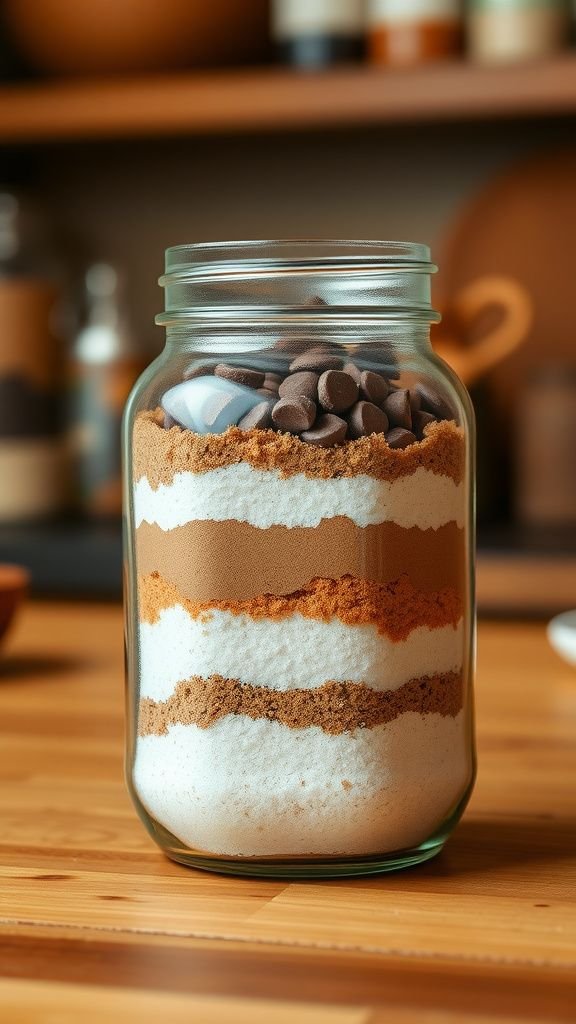
The layered jar of cookie mix looked like an edible geology, bands of sugar and cocoa stacked neatly. The contrast of colors felt inviting, and the top layer of chocolate chips sat like a promise.
The jar had a reassuring weight and a clear view of what would become a warm batch when later combined with wet ingredients. It carried the sense of a shared moment to come, each band a small visual countdown toward the smell of baking and the ritual of stirring together around an oven.
Steps
- Choose a wide-mouth mason jar and layer dry ingredients for cookies such as flours, sugars, cocoa, and chocolate chips in visually appealing bands.
- Compress each layer gently to stabilize the arrangement and top with a decorative fabric or paper lid cover.
- Attach a label with baking instructions, list of wet ingredients needed, and suggested oven temperature and time.
- Seal the jar to keep moisture out and present with a wooden spoon or recipe card.
Hand-printed tea towel using a simple block stamp

A hand-printed tea towel carries the rhythm of the stamp in each repeat pattern, the slight irregularities making it feel friendly. The linen absorbed ink in different ways, creating soft halo edges and little islands of denser color.
Pressing the block left a faint relief that invited tactile inspection, and the folded stack of towels looked like a tiny artisanal shop display. The towel felt practical yet decorative, and the smell of ink mixed with fabric lint had a homey honesty that made dish-drying feel slightly less mundane.
Steps
- Choose plain linen or cotton towels and a carved block or stamp with a simple motif and fabric-safe ink or paint.
- Press the stamp into the ink evenly and apply it to the towel surface, repeating the pattern while allowing breathing space between impressions.
- Allow printed towels to dry fully and heat-set the ink according to product guidelines to improve washfastness.
- Fold neatly and present stacked or rolled with a twine tie.
Lifelike paper flower bouquet in pastel shades
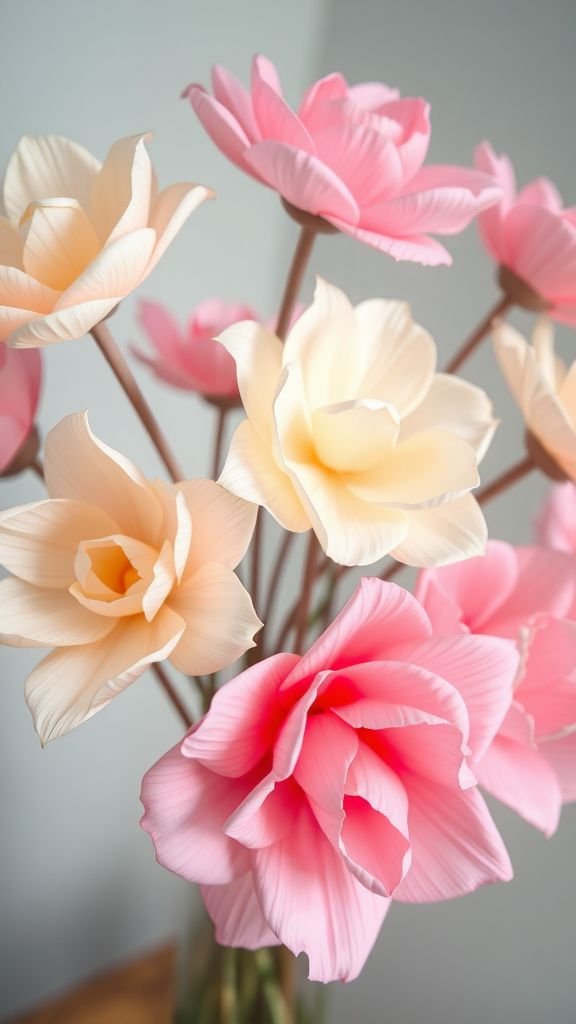
A paper bouquet surprised me with how lively it could feel without any scent. The crepe petals had a slightly ribbed texture that caught the light like real blooms, and thin wire stems allowed gentle adjustments to posture.
The pastel palette read soft and calm, and the edges of petals had a hand-ripened look that made the whole arrangement convincing at a glance. It sat happily in a small vase and required no water, acting as a permanent mood on the table.
The bouquet felt like a long-lasting hello.
Steps
- Select high-quality crepe or floral paper in pastel shades and cut petal shapes according to desired flower types.
- Wrap petals around small wire stems, shaping petals gently to create volume and natural curvature.
- Secure petal bases with floral tape and add leaves or small filler pieces to enhance realism.
- Arrange the paper flowers in a vase and trim stems for balanced composition.
Colorful stamped stationery set with personal motifs
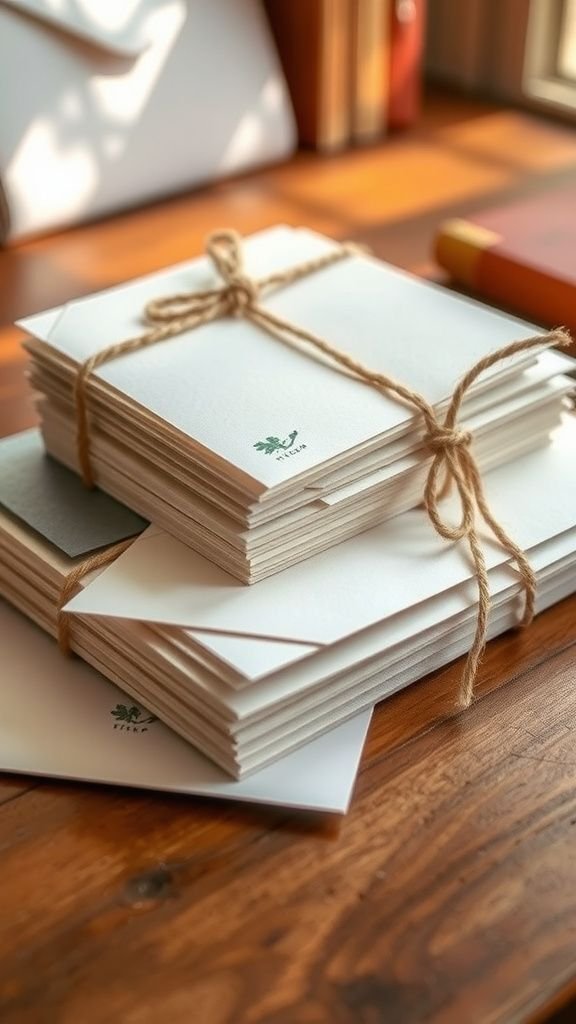
I loved the ritual of receiving a hand-stamped note, the little emblem in the corner acting as a wink. The paper had a pleasant tooth and the ink settled with a soft halo where the stamp pressed most firmly.
Each piece in the set carried its own slight variation, making the whole suite feel handcrafted rather than factory perfect. Tying them with twine made the set feel like an invitation to slow correspondence, and the stack on my desk was both decorative and oddly encouraging.
Steps
- Choose high-quality stationery paper and carve or select small rubber or wooden stamps with motifs that feel personal.
- Ink the stamp with a pad suitable for paper and press firmly and evenly onto sheets to create a consistent impression.
- Allow inked paper to dry fully, then sort sheets into matching sets and include matching envelopes.
- Tie the set with twine or ribbon and add a small label describing the motif or intended use.